Zero dishes, no special equipment! Making homemade yogurt is a simple 4-step process. Photos show every step for how to make yogurt successfully! This is how we weaned off sweeteners, from white sugar to sucanat!

Making homemade yogurt is like tying your shoes.
If someone tried to explain the shoe-tying process in spoken word only, you’d have an awfully hard time figuring it out.
But as long as a kind person shows you how to tie your shoes, and then you get some practice in, by the time you’re an adult, it’s brain-dead easy.
Such is homemade yogurt.
It sounds intimidating and scary, a real challenge, if you just talk about it with someone, or perhaps try to skim the easy homemade yogurt post. I had a couple friends in real life tell me so this year, that they were overwhelmed by my post and couldn’t imagine completing the task.
One of them also said that “If you show someone once and they can repeat it, it’s a task worth doing.”
That’s my hope for homemade yogurt, that after I show you once, you’ll be brave enough and feel confident enough in the method to accomplish yogurt all by yourself.
To prove how easy it is, I visited one of these friends who couldn’t get it online. We made yogurt together while our kiddos played, and she is now a regular yogurt maker extraordinaire.
She decided that making homemade yogurt is like baking bread – you don’t need that much time and it’s not that hard once you figure it out, you just have to time it right to get all the little parts into your day.
A few readers/fellow bloggers have let me know that it turned out easier than they thought, too:
from Meg at Everyday Miracles: I’ll join the “OMG Katie’s yogurt method is AMAZING” chorus if you’d like. Your original instructions were what finally got me over the fear of trying it & once I did, I don’t know what took me so long. I’ve recommended it to a number of people since then, and I’d be happy to share with your readers how much I love it. :)”
And you get paid quite handsomely for your time, too—about $35/hour. I save well over $1000 on the food budget every year just by making this ONE food from scratch. Here’s the math. What are we waiting for? Let’s make yogurt!
Homemade Yogurt Recipe Video

Can’t see the video? Watch How to Make Homemade Yogurt on YouTube.
Basic Homemade Yogurt Instructions
- Heat to sterilize the milk. (160-180 degrees F)
- Cool milk to proper incubation temperature. (90-110 degrees F)
- Add starter yogurt. (2 Tbs. per quart)
- Incubate at warm temperature 4-24 hours.

It really is that simple. Now let’s look at what that comes out to be in reality…
Photo Tutorial of Making Homemade Yogurt
Supplies necessary:
- Glass jars (quart wide mouth canning jars or empty spaghetti sauce jars work great) – make sure they are clean and were completely dry before capping.
- Whole Milk (skim milk will create thinner yogurt, every time – click for more on what milk to use to make homemade yogurt)
- Candy or meat thermometer, but I can show you how to do it without one too
- Pot large enough to hold your glass jars
- 2 Tbs of plain yogurt per quart of milk (Buy the freshest yogurt possible at a store and make sure it has “live and active cultures”. I have used Dannon, Stonyfield, and Fage. Your previous batch of homemade yogurt will work for the next time.)
- picnic cooler
- bath/beach towel
- timer
1. Put a washcloth in the bottom of your pot to cushion the jars.
2. Fill jars with milk.
3. Place jars in pot; fill with tap water (I use hot because I’m impatient, but a wise reader pointed out that COLD water and cold milk reduces the chance of breaking jars).

4. Lid the pot for faster cooking time.

5. Turn burner to high.
6. Set a timer so you don’t forget. My pot takes 10 minutes to get to 110F.

7. Heat milk to 160-180F for pasteurized milk or raw milk you want to pasteurize (raw milk yogurt is tough to get smooth and creamy without heating the milk to at least 160F. My friend Wardee has a free guide to getting raw milk yogurt the thickness you’re used to).
OR

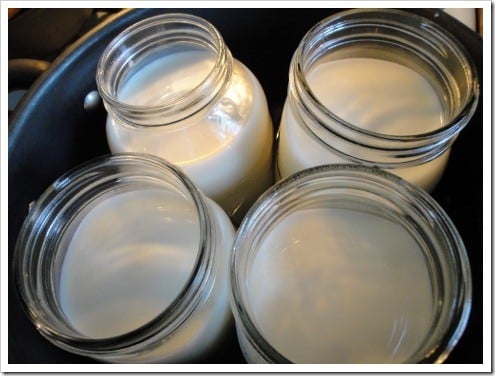
For truly raw yogurt, heat to between 100-110F. If it gets higher than 118F, you’ve killed your enzymes and may as well go up to 160F. The photo above was pushing the limit, but still okay!

If you don’t have a thermometer, 160ish looks like this with a “skin” on top. The water in the pot will be boiling.
8. Remove jars from pot. I usually lid them and use an oven mitt so I don’t spill – they’re very hot!
Q: “Ack! One of my jars broke! What did I do wrong???”
A: Nothing. Sometimes jars just break, unfortunately. Low-quality glass jars break more often than canning jars, but it just happens sometimes. ![]()
9. Put a lid on the pot of boiling water and nestle it into a picnic cooler like this:

Close the lid of the cooler so it gets toasty for when you’re ready. (If making raw yogurt, bring the water TO a boil while you’re mixing yogurt into the jars, since it won’t have boiled yet.)
10. Allow milk to cool down to about 100-110F. (Skip this step if making raw yogurt. If your raw milk heats to above 110F, allow it to cool back to 100F.) I think the best yogurt is made at about 100 degrees.

You can let the milk cool in a number of ways:
- On the counter (will take 1.5-2 hours, depending on room temperature)
- In the fridge (but that will add heat to the fridge, compromising the food you have stored – I no longer recommend this, but it takes about 45 minutes)

- Outside in the cold
- If you’re in a real hurry, put the jars in an empty sink, then add cold water slowly to about halfway up the jars, then ice packs or ice. They’ll cool in 15-20 minutes (watch closely), but you risk jar breakage.
11. When the milk is at temp (feel on your wrist for “just warm, not hot” if you don’t have a thermometer), stir in 2 Tbs. plain yogurt (2.5-3 for raw yogurt). I just use 2 heaping scoops with a regular flatware Tablespoon. You can also get dehydrated yogurt starters at your local health foods store or Cultures for Health.

12. Stir well.

13. Place the jars in the cooler next to the hot pot.

14. Wrap the towel over the jars and tuck it between the jars and pot if you can – you don’t want the hot pot getting the jars TOO hot, especially if you’re making raw yogurt and the pot has just boiled.
15. Take the lid off the pot to let steam out (I just leave it in the cooler out of my way; yours may or may not fit.) If you had just boiling water, let some steam out for about 5 seconds; if it’s been in the cooler for a while, slam the cooler lid right down to trap all the heat.

16. Allow the cooler to sit and incubate your yogurt for you for 4-12 hours.
Could you incubate elsewhere? Sure! Anywhere you can keep the jars at about 100-110F, including your oven with the light on, perhaps resting in the pot of warm water, wrapped up in towels with a heating pad plugged in, in a hot car, or in an Excalibur dehydrator set to 100 or 110F. I like the cooler because then it’s not in my way if I need the oven and doesn’t use any energy like the dehydrator.
17. Take out the jars and put them in the refrigerator. Done!
Just pour the water out of the pot and flip it upside down to dry.
Notice: no dishes. How cool is that?
Be sure to save a half cup of this batch to be a starter for the next batch. I like to put some in a little container right away after the yogurt has cooled fully and set, so then I don’t have to worry about someone finishing the last jar and eating my starter! This practice also avoids contamination problems if someone dips into your serving jar with a dirty spoon…

24-Hour Yogurt
If you’re on the SCD Diet or similar, you may need to incubate your yogurt for 24 hours. After 8-12 hours, just boil a few cups of water and pour it, steaming hot, into the pot. That should add plenty of heat to keep at incubation temperature for the next 8-12 hours. Depending on your room temperature, you might need to add boiling water once or twice.
See it to Believe it
If you’re a very visual person and want to see the whole process on video rather than still photos, I do have a guest lecture in the Seeing in the GNOWFGLINS eCourse on Cultured Dairy and Cheesemaking. Becoming a member in the eCourses really is invaluable – you spend a little money to save money in the long run. With access to everything all at once with any level of membership, you can sign up for a month, glean what you can, and wait a while before signing up again.
Just as many, many people were encouraged to make water kefir after seeing my 3-minutes-a-day water kefir how-to video, I know that when you see how easy homemade yogurt is, you’ll know you can handle it!
Even if you only take away a confidence with homemade yogurt, the $11-12 you’ll spend for one month’s membership will be offset quickly by the hundreds of dollars you’ll save making it, as long as you would usually buy at least ONE 32-ounce tub of yogurt per week. Just one.
 From a Rookie’s Kitchen
 From a Rookie’s Kitchen
My dear friend Tiffany of Don’t Waste the Crumbs saw my exhortation to make yogurt.
She had some excuses about why to not make yogurt.
However, she overcame and shares her yogurt making method!
I have a confession. When I saw “making your own yogurt” on that list of baby steps, I thought Katie had lost her marbles. Never in a million years did I think that I’d EVER make yogurt. Nor did I want to. It was daunting and downright scary.
Eventually I gave the idea of making yogurt a second chance. Maybe it was more of a mental hurdle than anything else, because once it was done, I realized how simple it everyone was claiming it to be. Leading up to the actual making, however, I employed every excuse imaginable.
- Katie’s recipe uses a big cooler. Nope, don’t have a cooler. Guess I can’t make yogurt.
- She calls for quart jars. Don’t have those either.
- Her pot is big enough to hold four quart-sized jars. Besides not having the jars, my pot is too small.
- Some people add powdered milk to make it thicker? Nope, not taking the chance on that one. Something about oxidized cholesterol when the milk goes through all the tiny holes. Not sure what that means, but it doesn’t sound good.
- Some have had success using a heating pad? Wait, I have a heating pad…
- Whole milk can make it thicker without using powdered milk? Um…
- Any size jar will work. Well shoot.
Officially out of excuses, I (reluctantly) put on my big girl panties and psyched myself up to make yogurt.
Making Yogurt – Heating Pad Method
Since the cooler, crock-pot and oven methods were ruled out, there was only the heating pad method left. This is a good thing for beginners like me though, because it’s practically fool proof!
Supplies
- scant two quarts whole milk (equivalent to a half gallon, an easy measurement to halve or double to suit your own family’s needs. I use organic, but again, decide what’s best for your family.)
- 4oz plain Greek yogurt, room temperature (full fat, remember, to be used as the starter culture)
- 2 quart-size jars, or 4 pint-sized jars, or a combination of these (but no more than four jars total), clean and sterilized
- small glass bowl
- candy thermometer (instant read meat thermometer should work too, Katie says)
- large pot (the biggest pot that comes in a typical set is the ideal size)
- bath towel
- heating pad
Method
- Pour starter yogurt into the small glass bowl. Set aside.
- Measure the milk by pouring it into your glass jars, leaving 1 inch of headspace at the top. This may sound silly, but your total volume will increase at the end with the addition of the starter culture. Measuring this way prevents the waste of ready-to-be-cultured milk!
- Pour the milk into the large pot.
- Warm the milk to 180 degrees F, stirring occasionally. It’s ok if it gets a degree or two warmer, but you don’t want to walk away and let the milk boil. Take my word on this one.
- Turn off the stove and let the milk cool to no warmer than 115 degrees F. If left on the burner (with the burner turned off), milk cools at a rate of approximately 1 degree per minute (or roughly 65 minutes). Cool it quicker by setting the pot on top of a cooling rack, like you would for cookies. The temperature drops to the desired range in about half an hour.
- While the milk is cooling, set up your incubation station. Fold your bath towel in half, long ways, and lay it on top of the kitchen counter near an outlet. Set your heating pad on top of the towel, folding in half if necessary.
- Pour 1-2 cups of the cooled milk into the small glass bowl. Whisk heartily for about 30 seconds to thoroughly combine the yogurt and the milk.
- Pour the milk/yogurt mixture into the big pot of warm milk. Whisk heartily for one minute to thoroughly combine the mixture.
- Carefully pour the milk into the glass jars, leaving about 1/2″ of headroom in each jar. Use a measuring cup, ladle or funnel if you’re pouring-challenged. If there is milk left after all the jars have been filled, slowly add the remaining milk to the jars. Take care to not overfill. (This is when you’ll be thankful you measured into the jars in the first place.)
- Cover with the lids and set on top of the heating pad. Quickly rinse and wipe out the pot (you can wash it later.)
- Wrap the towel over the jars.
- Turn the pot over and place it over the towel.
- Turn the heating pad on low.
- Come back in 8-24 hours to homemade yogurt! Store in the refrigerator and enjoy!
Nothing “magically” happened that we suddenly eat more yogurt, but knowing the incredible health benefits it offers certainly helped (and realizing we bought 98 ounces of yogurt in two weeks was the firm kick in the pants I needed make our own). Now that we have ample in the fridge nearly all the time, it’s easy to eat even more!
Every single one of the “how to use” suggestions above has been tested and approved in our kitchen. Yes, the we-don’t-eat-yogurt family now eats (and loves!) yogurt!
More Yogurt Posts
- new homemade yogurt troubleshooting guide
- how to thicken up raw yogurt
- the huge “how to make homemade yogurt” everything post
- raw milk yogurt escapades – what not to do at home!
- How to make yogurt cheese and whey – this is also how to make Greek style, super thick yogurt; you just don’t strain as long, only about an hour
- If you really aren’t up to making your own, see why storebought really is a good option.


I take a probiotic called “Ultimate Flora”. It contains 10 probiotic strains. Can I use this for the starter cultures?
No, I don’t think so Pamela – the probiotics won’t necessarily culture at the right temp nor thicken the milk. Gotta use yogurt cultures! 🙂 Katie
Will this method work for making only one jar instead of 4? I know that’s a lot of work for just one jar, but I have a starter fro Cultures for Health that I want to get going and then use to make more next time. I guess I could just ask my Mom to loan me her little yogurt maker when she comes to visit, but that’s a few weeks out yet.
Absolutely, Amy! It works the same no matter the volume. Make sure your CFH starter is one that you need to heat – many of theirs are room temp starters. 🙂 Katie
I haven’t taken the plunge to make my own yet (I know, I know 😉 but I’m the only one in the house who eats it regularly!) BUT someone just posted on FB asking for advice on making yogurt, so I sent them this link! Love spreading the KS love, this blog is such a wonderful resource for me and so many others 🙂
Aw, thanks Zena!!
🙂 Katie
hi, how do you know when the yogurt is ready? your post lists 4-24 hrs which is a very wide range. i used raw milk in quart size jars and only heated it to 100-110* help!
Jade,
It’s ready *anywhere* in that time – you’ll just get different flavors depending on when you stop culturing. So experiment to find what you prefer. More lactose will be gone and higher bacteria counts the longer you let it go, so 12-24 hours is healthier yet, but takes more work to keep it at a constant temp. 🙂 Katie
The more I research homemade youghurt, the more questions I have. For instance, using goat milk may prove a little healthier than using cows milk. It is however, more expensive.
So my question is, will a mixture of cows milk and goats milk set up properly? My yoghurt maker is in the process of being delivered so I can’t test this myself, yet.
Was just hoping this had been tested already and conclusions drawn.
Katie, I like the suggestion to use skim milk and cream, but what about evaporated milk? Is it a viable alternative?
Lonnie,
I’ve never heard of anyone trying it – but also it is canned, so super pasteurized (“dead”) and may have problems…
🙂 Katie
I have an idea for you: instead of using oven mitts to handle your jars, use rubber cleaning gloves (the yellow gloves usually). They provide a barrier between you and heat so I use them to handle my jars or when I’m working with really hot water. I wouldn’t use them, however, for actual pots that have extreme surface heat.
I wish Pyrex had canning jars similar to their glass liquid measuring cups. Retains heat on inside, but you can handle from outside.
Pingback: Slow Cooker Stuffed Cabbage "Un-Rolls"
Question: how long can homemade yogurt sit out at room temperature before it goes bad?
My yogurt maker turned off after 8 hours due to a power outage. I didn’t realize this until 12 hours later. So it sat at room temp for 12 hours. Is it ok to eat still?
I would just taste it. I forgot to take mine out of the cooler once, and it sat for a long time! I tasted it, it tasted good. We ate it. 🙂
Pingback: Weekly Paleo Meal Plan #2 | Landon Gilfillan
Pingback: Weekly Paleo Meal Plan 12/4/2013 | Landon Gilfillan
Pingback: Necessity Is The Mother of Invention: Living naturally on a budget | Landon Gilfillan
You pasteurize it? Ugh, why?! That denatures the proteins, and a lot of people have issues with milk once it’s been pasteurized. It makes my son break out in a rash, whereas raw does not. Also, why would anyone buy raw milk just to pasteurize it?!
Carly,
I just didn’t have luck with raw yogurt, not enough that my family ate it consistently. It is not high temp or flash pasteurized, but gently warmed. We are fortunate that we do not have problems with dairy.
Could I make my own ALMOND milk yogurt? I do not eat dairy and I Almond yogurt is even MORE expensive than the run of the mill, so if I could make it myself I would definitely try it!! THANK YOU for any insight!!
Yes! You can – here’s a link – www.lexieskitchen.com/lexies_kitchen/2011/9/14/almond-milk-yogurt-dairy-free.html
And I have other coconut milk yogurt methods pinned here: http://www.pinterest.com/kitchenstew/we-heart-homemade-yogurt/
Good luck! 🙂 Katie
Hi! I am very interested in making homemade yogurt, but am allergic to dairy. I would like to make almond milk yogurt. Do you have suggestions?
The sites/Pintrest boards above are no longer available.
Hi Ruthann, I recommend using gelatin as the thickener in this recipe: https://www.luvele.com/blogs/recipe-blog/how-to-make-almond-milk-yogurt I have made this coconut yogurt and I think it tastes much better than any almond milk yogurt I’ve had: https://dishingupbalance.com/homemade-coconut-yogurt/ Cultures for Health also has a vegan yogurt starter that you can use in different alternative milks: http://www.kitchenstewardship.com/CulturesForHealth Good luck!
I make yogurt from lactose free UHT whole milk (I’m the only non-lactose intolerant in my family) which is not “supposed” to work. ;). I use Greek yogurt and the oven method and culture 24 hrs)
Try a small batch and see. I now make it by the gallon. Good luck!
Pingback: 101 Fabulous Fermented Foods - Nourishing Joy
Pingback: KYF #044: Listener Questions
I used your old post in our previous home and would incubate it in the oven with the light on. My yogurt always ended up so runny…and I wondered if just the light on was enough. It sure wasn’t 100*
Our stove now seems to be the same and won’t heat below 170* so I’m going to try the cooler method tonight and cross my fingers!
Thanks again for the great break-down of an already terrific tutorial!
Pingback: Save $374 a year on groceries by making this simple breakfast switch
I have a yogurt emergency! I’ve been making 4 quarts of yogurt at a time once or twice a week for a while now. We eat a LOT of yogurt. I use this method and it works perfectly, every time. Yesterday I put my jars in the cooler at around 10am, with the intention of pulling them out before bed.
I forgot.
I noticed the cooler at about 8am this morning and freaked out. The temp of the yogurt was around 77F. I put them in the fridge but now I’m worried. It smells fine but is it ok to eat after sitting there all night at a less-than-ideal temperature?
Many of us purposely leave it for 24 hours so all the lactose is converted by the bacteria, so yes it will be fine. The good bacteria crowd out any bad bacteria. One of the reasons to bring the milk to a high temperature is to kill all the bacteria. If you did that and covered it, it will be fine.
I always get so excited when I see posts on homemade yogurt! 😉 I’ve been making my own for about 2 years now and we love it. My process has changed a little from when I first began making it in the crockpot. Now I heat up my milk in a double boiler (just one pot nested in a barely larger one with a couple inches of water) so I don’t burn my milk. I also add 1/3 cup of powdered milk and 1/3 cup of sugar to my 8 cups of milk while it’s heating up. I know some have issues with powdered milk, I don’t. Anyway, bring it up to temp. Remove from heat, plop into a pot of ice and cold water until the temp hits 110 (I’m super impatient, lol), stir in a tbs. of vanilla extract and 1/3 cup of yogurt for a starter. Then I pour into half pint jars, lid, and place in a styrofoam cooler with 3 hot towels. Leave it alone for 6-8 hours and then remove to fridge. 🙂 Easy peasy! And I LOVE having the yogurt in half pint jars. They’re just the right size for lunches and snacks for my family. Plus they just look so darn cute in my fridge! Oh, how I love homemade yogurt! So far none of my friends will make it. I had two try but neither one of them got their batches to turn out so they gave up. I think I need to invite them over to watch instead. 🙂
Do you use this flavored yogurt as your starter for your next batch, or buy some plain yogurt to use for a starter?
How long does homemade yogurt last for? When you make new yogurt, can you use the homemade yogurt to make the new?
Thanks!
Jennifer,
It lasts a fairly long time, at least two weeks, if not a month. And yes, you use the old batch to make another batch, almost indefinitely. You’ll know if/when you need to buy a new starter! 🙂 Katie
Pingback: Basics: Easiest Homemade Thick and Creamy Yogurt Ever « familynaturally
Pingback: Homemade Breakfast | At The Well
Thanks for outlining this method. I made my first batch of yogurt ever, using 2% milk with some additional nonfat dry milk, Dannon plain yogurt as starter, and incubating for seven hours. The method worked flawlessly, and the yogurt was rich and creamy with perfect acidity.
I see you have a container of Stoneyfield farms as your starter. Have you heard anything about their connections with Monsanto? There was an article a while ago that caught my eye about Stoneyfield working with them and feeding their cows GM food. I would love to know your thoughts on this. I have still been buying it- I feel kind of damned if I do and damned if I don’t. If I buy a different brand it will be the same thing I am sure, so until I find something else I will buy it for now.
Arg! That’s how I feel! 🙁
I didn’t see anything about that. I thought organic had to be no GMO? Hmmmm…I’d have to look into it more before I say anything about it or believe it, but here’s another reason why I’m happy to make my own and rarely buy any from the store at all. Of course, since the GM corn cross -pollinates with all the other corn, I know the organic cows that give us our local raw milk are still eating some GMOs when they have a bit of silage in the winter. Le sigh. I’m disappointed that our new milk farm doesn’t use 100% hay in the winter like our old farm did…different breed of cow, needs more energy.
Katie
plain quality yogurts/kefirs are like fine wines. if you need to serve them cold on ice with fruits and flavors like a wine cooler its because the quality is not there. Good quality cultured fermented milks are best served like good wine cool but not cold.
I’ve over time gotten to where I cannot eat flavored yogurts/kefirs – the taste of properly made plain yogurts/kefirs is far superior to any flavors that could ever be added. masking the taste is likely best for yogurts that are flavorless or yogurts/kefirs that are not well made and lack the delicious natural cultured flavors.
Hi there,
Do you screw the lids on tight on the jars or just let them rest on there? Thanks. Shelby
Shelby,
I screw them on tightly, in case someone bumps the cooler. The yogurt doesn’t need to “breathe” like some ferments.
🙂 Katie
Frank White of Monogahala, PA has raw milk grass fed cows. Very reasonable. South of Pittsburgh
Pingback: 3 Reasons to Snack on Probiotic Foods | daily digest
Pingback: Foodie Failure: How to break glass and waste milk » The Cheapskate Cook
I love making the yogurt in the jars since it’s so much less of a mess (ie. no cleaning the cooked milk from the bottom of the pot)… however, my jars have started breaking 🙁 Do you have this problem ever?
ETA: The jars don’t break while I’m making it – I find them broken later in the freezer, fridge, cupboard… I use the same jars for yogurt, stock, crispy nuts, etc. I’m assuming they are breaking because the heat is hard on them? When I make yogurt, I use 5 quart jars in a large stockpot, heat until it films on top, and then use my dehydrator at 100 degrees for 24 hours.
EW,
I was all ready to answer your Q until I saw the edit – really, in the cupboard even? That one I’ve never heard of…I’m bamboozled. If you’re using quart jars that are meant for canning, they should be holding up with heat no problem. This is very odd to me, and I’m so sorry you have messes in the fridge! 🙁 Maybe don’t do the freezing thing? I wonder if that’s giving you hairline cracks.
I did learn to use cold water with the cold milk and bring it up to temp slowly, and I haven’t had any broken jars since I stopped using hot water…but I’ve also never had them break in the fridge or cupboard without warning…
Katie
Thanks so much for the suggestions! I wanted to update now that I’ve made a few more batches. I think starting with cold water surrounding the jars and bringing it to temp more slowly does the trick. I had previously been starting with hot water and heating it up fairly quickly. I also haven’t put any in the freezer anymore just in case that was a problem. No more broken jars – yeah! 🙂 Thanks again!
I have found that the new canning jars did not hold up even if starting with cold water. The bottoms fell out of 3 of the six I used in the course of three makings. So I finally got fed up and have bought gallon-size, stainless steel bain de marie pots from a kitchen supply store. (http://www.webstaurantstore.com/) They are wonderful. I put them in the refrigerator with the lids that we bought separately. No more worries and I can start with hot water if I want. They heat faster, too.
Katherine,
Do you make the yogurt right in these pots, from the stovetop to the fridge? Or in jars in water in the pots? Where did you get the lids? I’m so curious! Thanks! 🙂 Katie
I use your method–milk in the pots to heat, cool to temperature, add the starter and incubate all in the pot. We bought the pots from this website: http://www.webstaurantstore.com/3109/bain-marie-pots.html
You will have to buy the lids separately but they have worked very well for us. We are all adults so having loose lids that just rest on top is not a problem for us.
Thanks, Katie! What easy to follow directions! I am sharing this with all my friends and family! 🙂 We have a gallon of yogurt cooling in the fridge right now! Can’t wait to test it! 🙂
I just read your yogurt making instructions and have a question. I just made my first batch of homemade yogurt– it’s still fermenting. I am using a yogourmet maker. I washed the inner vessel that holds the yogurt in the dishwasher and was then not able to make the yogurt immediately, so, making sure it was entirely dry, I covered it and put it away. The utensils were also dishwasher washed, but they have been “touched” the family member that put away. The thermometer I hand washed and throughly dried. Everything was ostensibly very clean, but not “sterilized.” I am now reading on some websites that everything should have been sterilized– boiled or taken directly form the dishwasher. Thus, my question: Should I throw out this batch that I am fermenting– or will it be it okay to eat? Is it safe to eat?
Take this as an anecdote from a friend, not “real” advice…but my jars and spoons are always right out of the cupboard, and we’ve never had a problem. A gallon a week for 5 years. I’m guessing you’ll be golden! Enjoy!! 🙂 Katie
Thanks so much Katie! Much appreciated!
OK, I finally got up the gumption to make my first batch of yogurt after many months of thinking about it. Well, I was called out to a birth while waiting for the milk to cool on the counter. When I got home, the milk was well below temp. I heated it up again and have continued as directed. I’ll have to let you know in the morning if it worked….here’s hoping!
Pingback: This Week’s Miscellany: Vol. 14 | Carrots for Michaelmas
The way I make it in the crockpot is no mess. I just put my milk straight in to my jars, and then add water to the crockpot. I can fit 5 pint jars into mine. Then all I have to do is dump the water out, and dry it. Works great!
Blessings,
sara
I had wondered about this method and just tested the temperature of water in the pot on the warm setting. It would work! I incubate with a cooler and water warmed to 120*, and I do both 2% and 1% milk (no thickeners) – both produce a very thick yogurt. In my microbiology class, we tested pasteurized vs. raw milk using a water bath incubator so that is where I got the idea and I see others do it too. I also cover my cooler with a plastic bag (great wind blocker), and then a fleece blanket I have. Also, I reuse my water bath a few times since it takes so much water to make yogurt (all the sterilizing).
The way I make it in the crockpot is no mess. I just put my milk straight in to my jars, and then add water to the crockpot. Then all I have to do is dump the water out, and dry it. Works great!
Blessings,
sara
I use an even easier method…I make it in the crockpot!
http://crockpot365.blogspot.com/2008/10/you-can-make-yogurt-in-your-crockpot.html
Everybody always tells me this one…But it’s not for me – first, I make a gallon at a time, and most crockpot recipes say it will fit a half gallon. Second, I hate washing that insert. Hate it. It would drive me nuts to do all that scooping out of the yogurt into jars and then wash the thing 3x every 2 weeks. Nope, the cooler works for me! 🙂 Katie
I make a whole gallon of milk into yogurt in my crockpot at one time. It fits very easily.
I also strain my yogurt (to make greek yogurt) and make it nice and thick because we love our yogurt to be very, very, very, very, very, very thick (my goal is to have it thick enough so it doesn’t slide off a spoon and my 1-yo can self-feed with “minimal” mess), so I’d have to take it out of the containers I cultured it in anyway.
I just heat the milk in a big pot (placed in another pot with water to prevent scorching)…then cool down and transfer to crockpot with starter. I culture it in the over under the light (I have it timed so I make the yogurt in the evening and it cultures overnight and the next morning). Then I strain the yogurt into another container (I let mine strain for a full day…as I said, I like it thick) and we usually just drink the whey or use it in smoothies or cooking. It does create more pots, but this works for me, and I never have to worry about glass jars breaking.
The last time I made yogurt I was still pregnant..(she is now 3mo).. I know. I know.. Long gap, it’s been hectic.. I set aside some for my culture and was hoping to make more today.. But I don’t know if my culture would still be any good.. It kinna has a slight dirt smell. Today was the first time it had been opened since being made months ago.
Krysta,
Yogurt lasts a long time, but dirt is not a good sign! I’d give it a month, but not 3 months. Invest the 69 cents in a little cup of Dannon plain! 😉 Good luck! 🙂 Katie
Ok, so just to clarify since I am not wanting to waste my raw milk which I did last week because it was gross, runny, and chunky….
It should be cooked to 160+ or should it not? I am confused. I want thick yogurt. I am using raw milk and I am new to this.
Thanks for the help ladies:)
Heather,
Today’s post (5/30) is all about raw milk yogurt, so stay tuned! I’m working on it now…
(But you’re right, one way to get thick yogurt is to get it up to 160+. Also, don’t waste – make smoothies or cook with chunky yogurt.)
🙂 Katie
Hi Katie,
I forgot to ask; why do you think the best yogurt is made at 100 degrees? Is it thicker, etc?
thanks,
Joyce
Joyce,
Yes, thicker, smoother! More on raw yogurt in today’s post: http://www.kitchenstewardship.com/2012/05/30/how-to-make-perfect-thick-creamy-raw-milk-yogurt-plus-how-to-fail-miserably-and-laugh-at-yourself/
🙂 Katie
I highly recommend buying a thermometer with a timer on it. I set it to 110 degrees and it beeps when it reaches that temperature. It took what was for me the only stressful step of making yogurt out of the picture. (having to keep running over and looking at the thermometer every few minutes.) I then add my starter and cover my crockpot with a small down comforter.
The thermometer that I have is a Polder and I bought it at my local grocery store for about $20–well worth the money!
thanks,
Joyce
We had one of these thermometers for a while. It was great, until it quit working. I checked on Amazon and it seems like most probe-type thermometers have a high failure rate (mostly with the probes).
We are die-hard fans of the crockpot method for yogurt making. We would save a small amount from each batch to use as the starter for the next batch. Only issue I had with homemade yogurt is that it didn’t last as long as store-bought.
I am also a HUGE fan of the crockpot method. After many months of thermometer method on stove , it was the most wonderful relief to find out how good the yogurt is with the crockpot method. So easy too !
I have never heard of a thermometer with a timer, but I will shop for one!!
Reading through some old posts and I was curious- if not using raw milk what kind of milk do you recomend? Raw milk is way out of our budget right now, so we’ll be drinking conventional for a while. Do you still think skim plus non-UHT cream is the best way to go?
Emily,
Answers here partway down the post: http://www.kitchenstewardship.com/2010/01/11/monday-mission-level-up-your-yogurt-game/
(So if you can afford the cream, the answer is YES to you, or even just whole milk. You do what you can!)
🙂 Katie
I looooooooove to use my dehydrator to incubate the yogurt. 🙂 I need to make some really soon….
I like to use Trader Joe’s European-style plain yogurt (red container) as a starter. We like that texture best, and it contains just hormone-free whole milk and active cultures, nothing else. (No pectin, guar gum, etc.)
If you accidentally boil the milk it will be SUPER creamy. It’s important to heat it at least to that ‘forms a skin’ point…I never check temperature with a thermometer and figured that out awhile ago. My yogurt usually comes out well.
…and if it fails and is runny or weird, mix in the blender with fruit and freeze as popsicles! All my kids will eat this, even the one who doesn’t like yogurt.
My family will only eat Vanilla yogurt (Dannon) or Soneyfield Chocolate Underground. How / when do you flavor the yogurt? We have been transitioning to whole foods for awhile but the family isn’t ready for plain yogurt (even with fruit or honey).
Susan, I came to the comment section for this exact same reason (we’re not ready for plain yogurt yet, either)!! 😉 I’ve flavored other plain yogurt as I served it – some of us like honey in it, some of us like real maple syrup…I’m guessing we could do the same with this??
Anyone else flavor this yogurt??
I came to this post for the same reason, too! I have asked this question on several blogs. I have been told that the alcohol in the vanilla extract won’t kill the good bacteria in the yogurt, but I’m sure I buy that. I have found alcohol free vanilla extract, but I can’t remember where. I still don’t know how much to use.
Linda
I thought I’d chime in for anyone combing this post for flavoring info. I add vanilla or almond extract and truvia to my yogurt when I add the culture. It doesn’t interrupt the yogurt process at all. You could easily adapt to add different extracts. I have also steeped my warmed milk with lemon zest and later added truvia to sweeten it a little. The resulting yogurt tastes like a lemon meringue pie.
Linda,
I am not sure how I missed this question SO long ago! Yikes!
I use 1 tsp. per quart for vanilla yogurt, although I do stir it in a jar after it’s done culturing. You’d know if the bacteria were killed if you add it during the culture because it wouldn’t work, it wouldn’t set. Good luck! 🙂 Katie
I came here looking for info on flavorings too, as well as to see if I’m doing things right. I just made my first batch a few days ago and found it pretty sour. Tried a few different things for my second batch (incubating now) but still left out any sweetener/flavoring because I wasn’t sure how it would effect the process to do it at the start. I do have one bit of advice, though. If you use vanilla, add it at the end because the flavors are volatile and heat sensitive. It may not effect the yogurt-making process, but it will lessen the strength of your vanilla to add it at the beginning.
Once it’s cool, you can add vanilla extract, maple syrup, or whatever else you like. My boys will eat it plain but my daughter and I won’t. We usually just use yogurt in smoothies though, to skip that whole “need to sweeten” thing!
Thanks, Kate!
I like your popsicle idea, too! So many yummy ideas with yogurt!! 🙂
Could I put a vanilla bean in the milk as it is heating or would that throw off the fermentation process?
Susan/Colleen/Linda,
In our family, we flavor by the bowl with a little raw honey and frozen fruit. If I’m taking yogurt elsewhere to serve, I use a teaspoon of vanilla and 1/4 c. sugar per quart and it usually goes over pretty well. You can stir it right into the jar, just be gentle, because whipping it up with a spoon will make it runny.
Susan, it would totally be worth trying a vanilla bean (or piece of one) in one jar while fermenting! I can’t think why it would stop the fermentation, and you’re only risking a few cups of milk – smoothies if it fails! 😉
Here are some more ideas:
http://www.kitchenstewardship.com/2010/01/12/kitchen-tip-eat-plain-yogurt-with-little-or-no-sweetener/
http://www.kitchenstewardship.com/2010/01/12/homemade-yogurt-recipes-so-you-can-eat-it-all-the-time/
🙂 Katie
I’ve seen your video on Gnowfglins, and it’s what gave me the courage to finally try homemade yogurt. I figured out a new way using my crockpot that is super easy, and also no mess. I’m hoping to post it on my blog this week. Thanks for sharing this!
Blessings,
sara
Yogurt is just like you said… hard until you get the hang of it, then totally easy!
I’ve done the yogurt very similarly to you, except I don’t do the in-the-jar method anymore. I had too many jars break and mess it up. I heat the milk up in the pot to 185 deg (I use raw milk) and then cool down in a sink of cold water to 105 – 110, and pour into the jars. Stir in the starter, put lids on and put in a big cooler with a pot of steaming hot water. I usually let the yogurt sit about 8 – 9 hours. Voila–easy!
I’ve decided that when my friends say “but that sounds so hard!” I will invite them over and we’ll make yogurt TOGETHER. Then they will see how redonk easy it is.
Wanna be your friend!! Def a ‘GOT TO SEE’ kinda gal!
Ok. My method is even easier. Instead of the cooler, just put the jars back in the pot with the hot water and put it in the oven with the light on. We do ours for 24 hours but it would work just as well for a shorter incubation period. Love your site!!! Thank you for all your research and encouragement
I have a variation on this – I put the jars back in the pot like a warm-water bath and put the whole thing in the cooler. It seems to me it would make everything retain heat better, and for our smallish cooler it’s the only way it all fits. Since I leave my jars on the counter to cool, the water (with the top off the pot) cools at about the same rate, and I don’t have to worry about cooking my starter cultures to death when I put the jars back in.